1.1.4 Resources
The Heart of Concourse
Resources are the heart of Concourse. Resources make Concourse tick and are the source of automation within all Concourse pipelines. Resources are how Concourse interacts with the outside world. Here's a short list of things that resources can do:
Run a job every five minutes: Time resource.
Run tests on new commits to the main branch: Git resource.
Publish a new release of your app on Github: Github Release resource.
Pull or push the latest image of your app: Registry-image resource
Resources can do a lot of things! The main goal of resources is to represent some external system or object in your pipeline. That external thing can then be used as a trigger for your Jobs or your Jobs can push back and modify the external system or object. It all depends on the resource you use and what features its author has implemented.
Resources are also how Concourse tries to stay as technology agnostic as possible. For example: Concourse doesn't care what version control system you store your code in, if you deploy apps with Helm or Terraform, or what language your apps are built in. If you can put your latest and hottest tech behind the resource interface then Concourse can understand your workflow.
The Concourse team bundles a few basic resource types that come with the Linux release that you can download from Github. You'll notice that the Linux tarball is much larger than the macOS or Windows tarball because of all the bundled resources.
You can find out which resources a worker has by running:
$ fly -t tutorial workers --details
Resources only run on Linux workers because resources are distributed as Linux container images. There are currently no resources for macOS or Windows. Only task steps can run on macOS or Windows workers.
Versions
Resources represent the external system or object to Concourse by emitting versions. When a new version is emitted by a resource, that is how Concourse knows to start jobs connected to the resource.
A version is a map of key-value strings that a resource generates to uniquely identify the state of the external system or object.
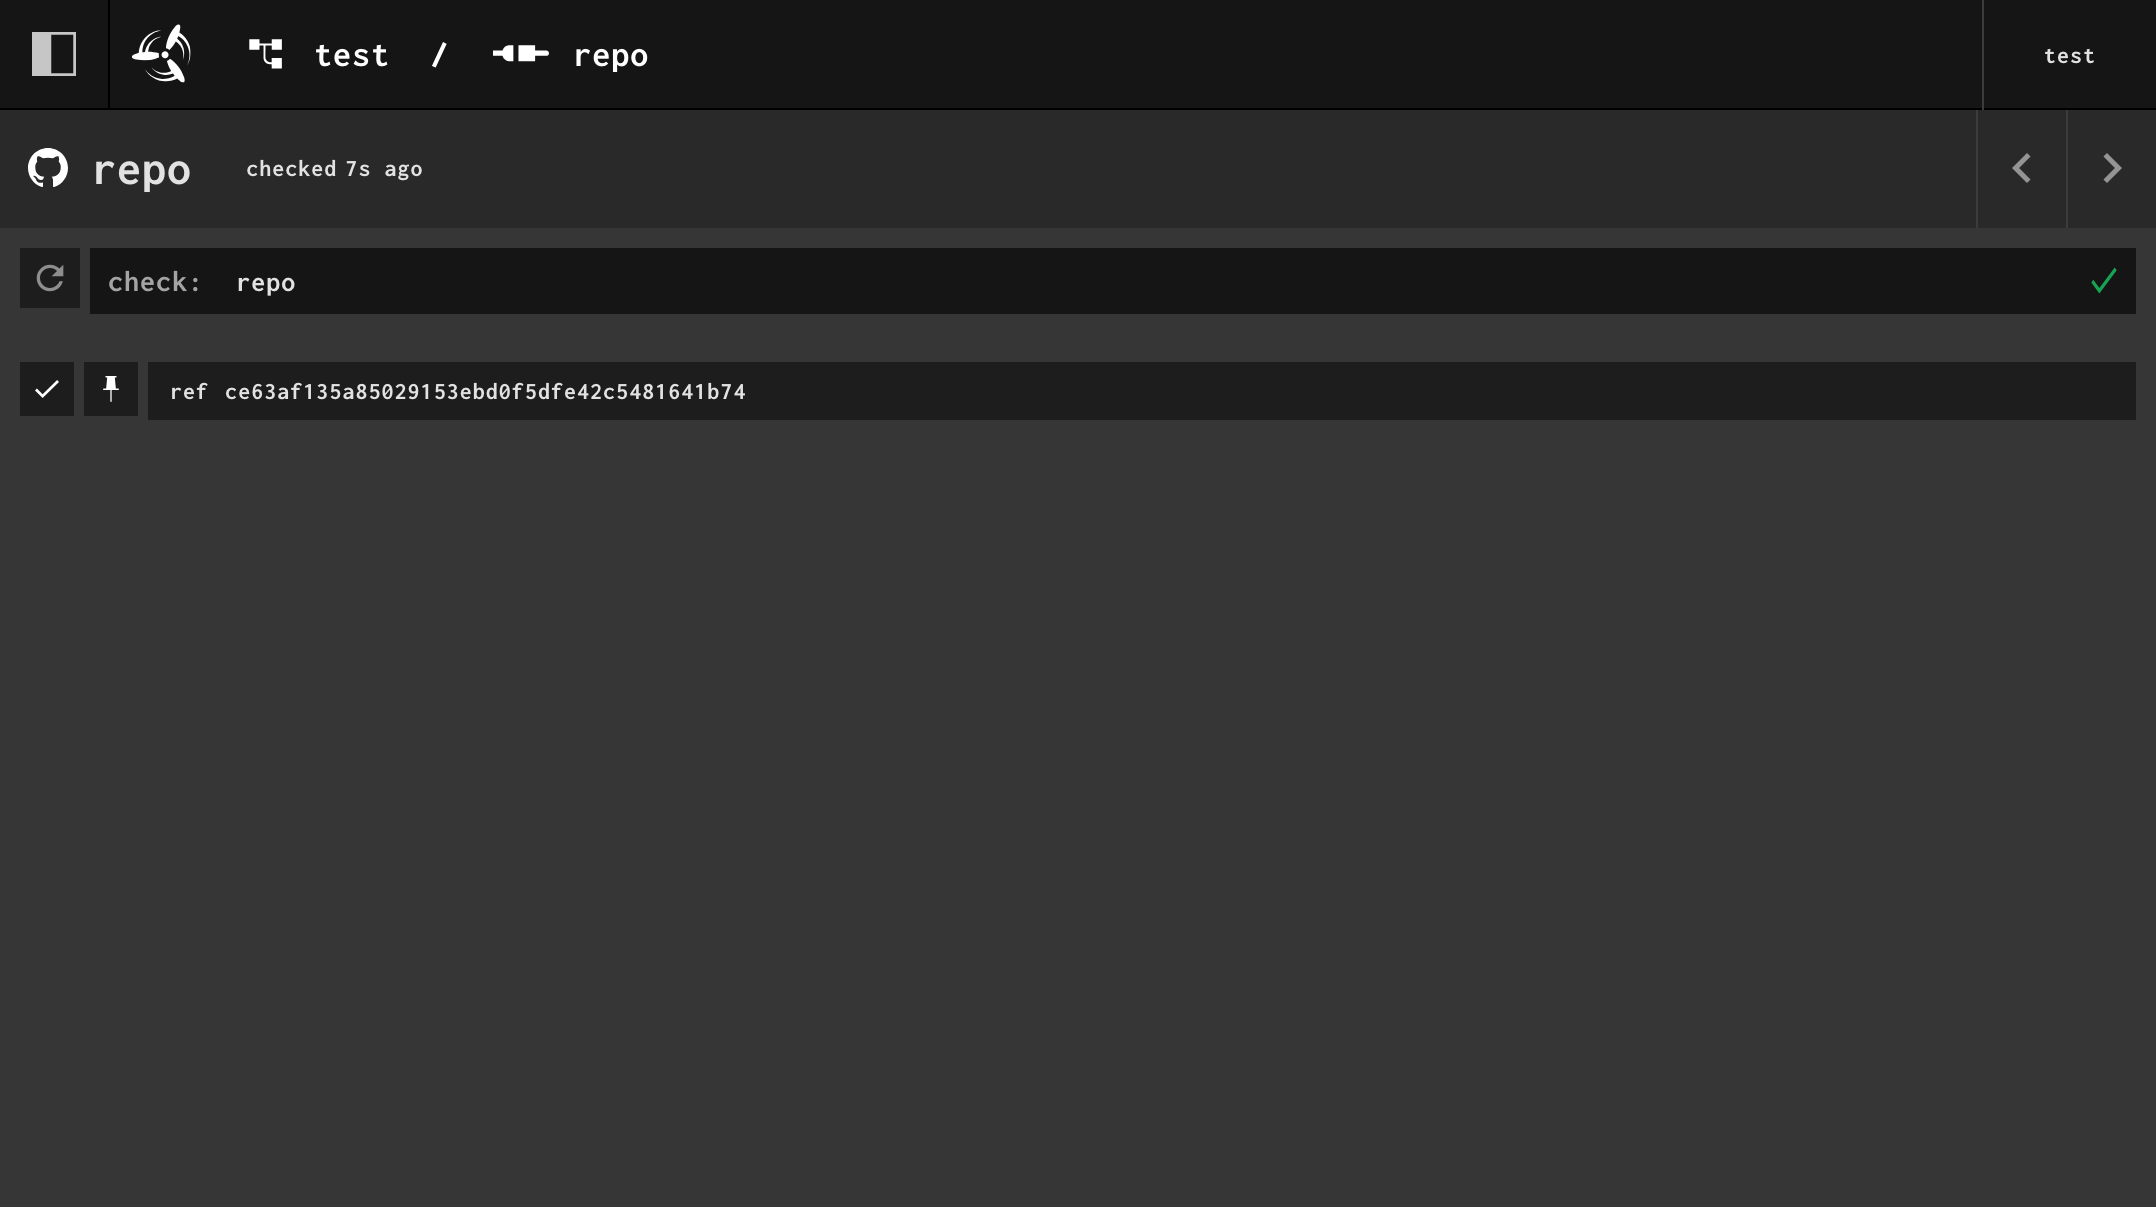
For example, the git resource emits versions based on the SHA of new commits it finds. A single version from the git resource will look like this to Concourse.
{ "ref": "ce63af135a85029153ebd0f5dfe42c5481641b74" }Which looks like this in the web UI:
Let's start digging into resources a bit more by going over the resource interface.
Resource Interface
Resources are container images that contain three executables. Each executable is run by a different type of step within a pipeline:
/opt/resource/check- implicitly run when a job contains a get step. Should return the latest version from the external system or object. Its responsibility is to find new versions. Is never part of a Job's build plan./opt/resource/in- run in a get step.inis given a specific version (generated by acheckorputstep) and retrieves the files and information representing that version from the external system or object./opt/resource/out- run in a put step. Generates a new version, usually based on some input generated by another step in the job. Depending on the resource, this may mean sending something to the external system. For the git resource, this means pushing commits to the external git repository.
That's a high-level overview of the resource interface, which should help you understand what's going on with resources when we start using them in the next section.
Automatically Triggering Jobs With Get Steps
We're going to create a new pipeline now. This pipeline is going to:
Fetch commits from a Git repository that contains an app
Run some unit tests for that app
Publish our app to GitHub
We have a very basic app in our github.com/concourse/examples repo that we'll use in your pipeline. You should fork this repository so you can continue following along. We're going to build the Go app under the apps/golang/ directory.
When creating a new Job or Pipeline, it can be helpful to think of all the external things the job will need in order to run, and declare them as Resources in our pipeline. We know we'll need our Git repository with our app's code, so we'll declare that as a resource first.
We will use the git resource to represent our Git repository. The README.md contains the documentation for how to use the resource.
resources:
  - name: repo
    type: git
    source:
      uri: https://github.com/concourse/examples.git
      username: <user>
      password: github_pat_...
You'll need to generate a Personal Access Token for GitHub in order to complete this tutorial. You can make a fine-grained access token on this page. The only permission required is
read-writeaccess tocontent. You may scope the token to your fork of theexamplesrepository.
We've added a top-level key to our pipeline called resources, which takes an unordered list of resouces that can be referenced by jobs in our pipeline.
When delcaring a resource, Concourse only requires you to declare the name and type. The name is how jobs will reference the resource.
Depending on the resource type you're using, the source will likely have one or more required fields. This is specific to each resource type, so refer to the documentation of the resource type to find out what fields are required.
Next, we can add a job that references our resource. Let's add a job to our pipeline that, for now, downloads our git repo. We'll use the get step to do this.
resources:
  - name: repo
    type: git
    source:
      uri: https://github.com/concourse/examples.git
      username: <user>
      password: github_pat_...

jobs:
  - name: tests
    plan:
      - get: repo
Let's set and run this pipeline.
fly -t tutorial set-pipeline --pipeline go-app --config pipeline.yml
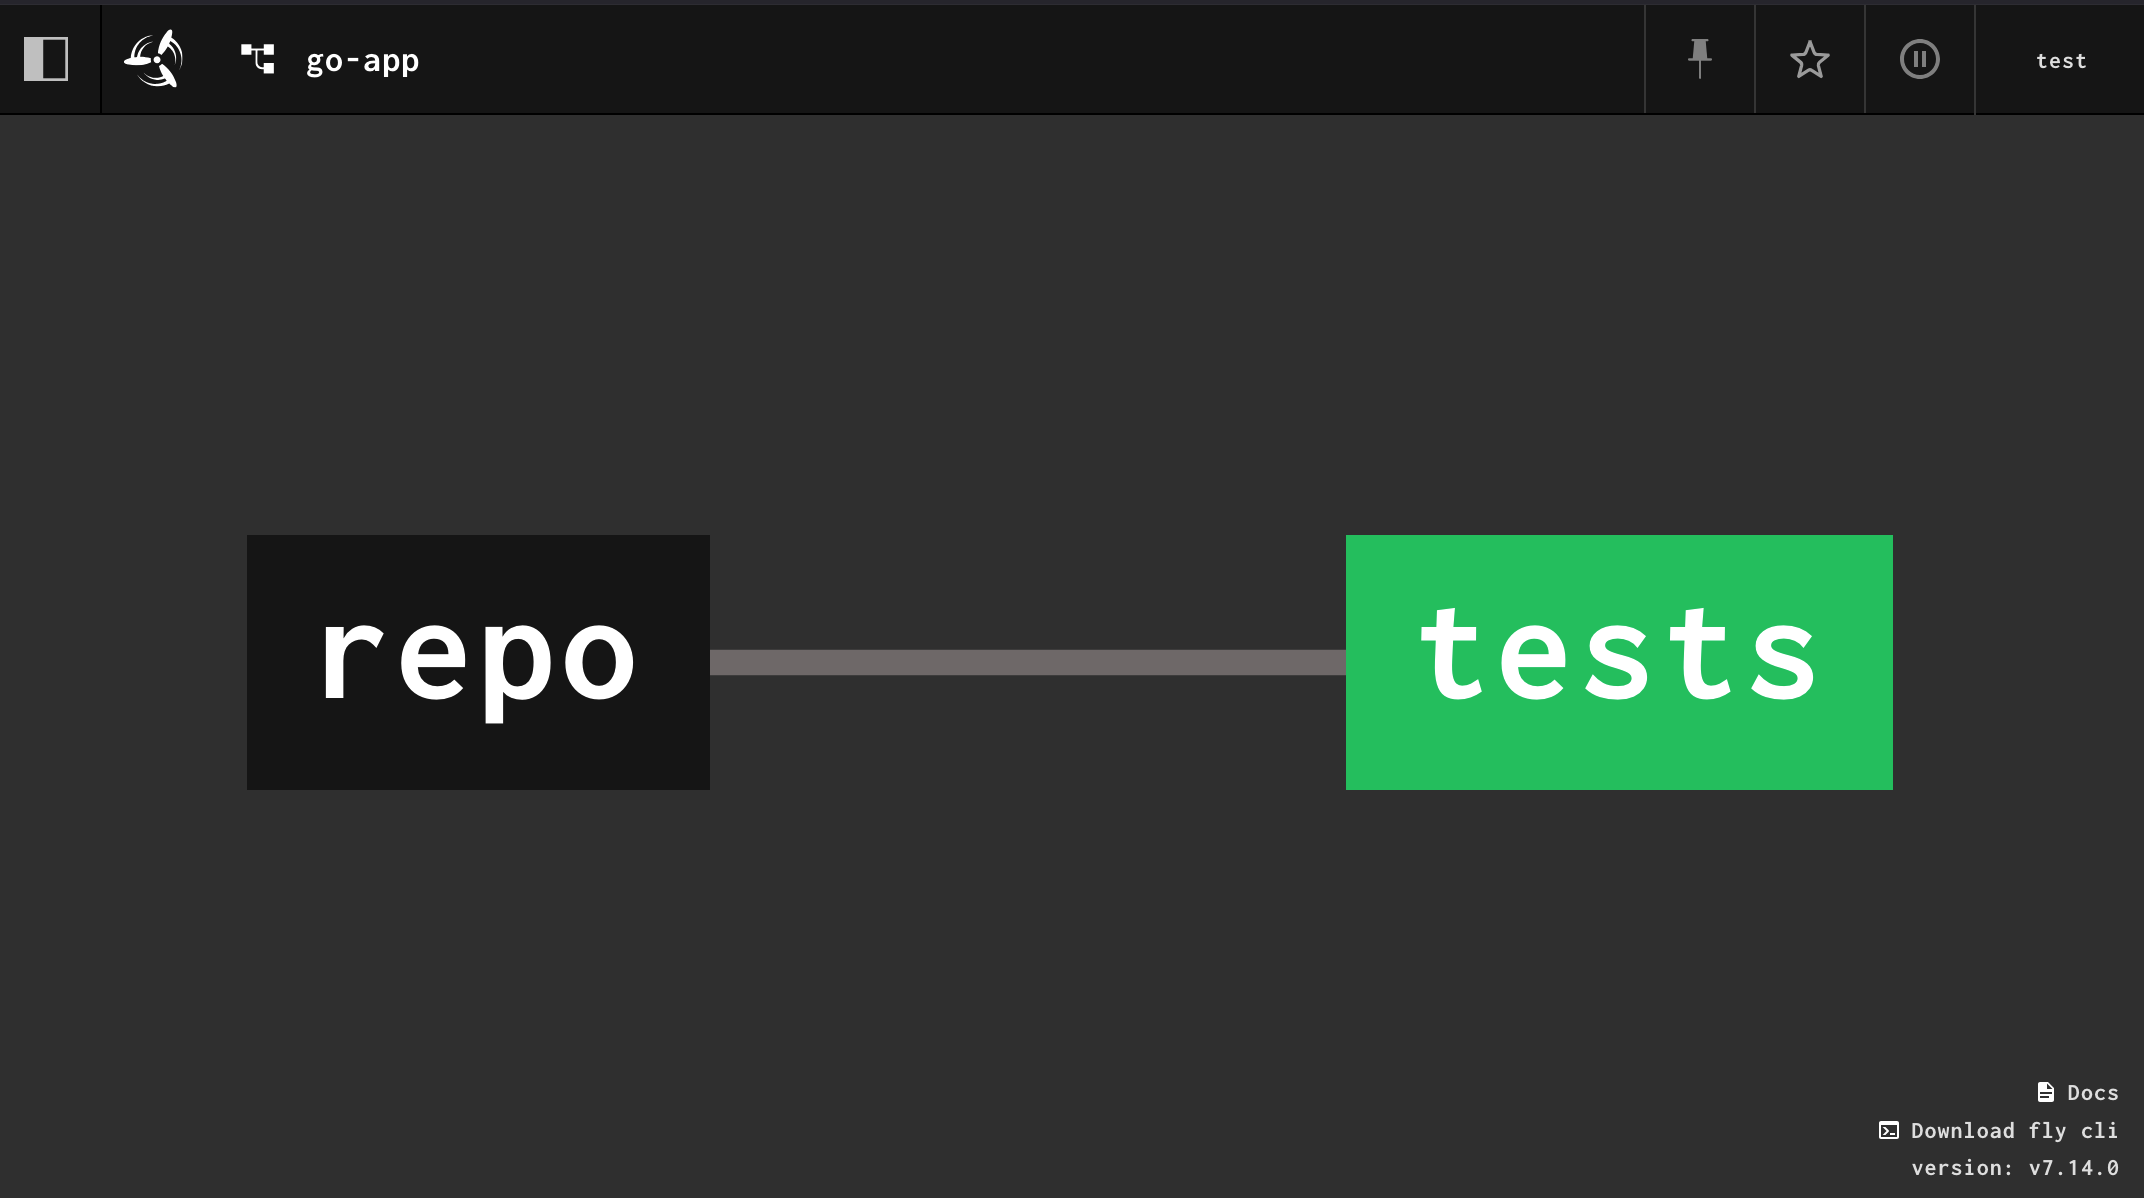
fly -t tutorial unpause-pipeline --pipeline go-appTo change things up, let's trigger our tests job from the web UI. From the dashboard you can click on the pipeline header to see the entire pipeline. You'll see two boxes, the left box representing our repo resource, and the right box representing our tests job.
Clicking on the tests job will take you to the Builds page of the job. In the top-right corner there will be a plus-sign button you can click to trigger the job. Click that button and wait for the job to start and complete. You can click the get step to expand it and see the metadata fetched by the git resource.
Hooray, we have a job that does a git clone for us! Now let's have the job run our application's tests. We'll add a second step to our job, a task step, that will run go test.
resources:
  - name: repo
    type: git
    source:
      uri: https://github.com/concourse/examples.git
      username: <user>
      password: github_pat_...

jobs:
  - name: tests
    plan:
      - get: repo
      - task: tests
        config:
          platform: linux
          image_resource:
            type: registry-image
            source: # Use the Golang image from Docker Hub
              repository: golang
              tag: latest
          inputs:
            - name: repo
          run:
            path: sh
            args:
              - -c
              - |
                cd repo/apps/golang
                go test -v .
There are a few things happening in this task step we added.
First, we had to choose a container image to use to run our tests in. To run our Go tests we need an image with the go binary. The golang image from Docker Hub is an easy solution to reach for here, so we tell Concourse to use that image to run this task. Concourse uses the registry-image resource to download the Golang image.
Next, we needed to provide our task with a copy of our git repo. The get: repo step added an artifact named repo that our task can reference as an input. Concourse will then take care of mounting a copy of our repo from the get step into our task's container.
The last part is us writing a small shell script that changes to the directory of our Go tests and finally runs go test -v .. We added -v to get a little more output from the tests.
Let's update our pipeline and trigger the job from the web UI again.
fly -t tutorial set-pipeline --pipeline go-app --config pipeline.ymlOur tests run successfully! Let's update the job so it will run on every new commit instead of waiting for us to manually start the job. We do this by adding trigger: true to the get step.
resources:
  - name: repo
    type: git
    source:
      uri: https://github.com/concourse/examples.git
      username: <user>
      password: github_pat_...

jobs:
  - name: tests
    plan:
      - get: repo
        # Cause job to run on new commits
        trigger: true
      - task: tests
        config:
          platform: linux
          image_resource:
            type: registry-image
            source: # Use the Golang image from Docker Hub
              repository: golang
              tag: latest
          inputs:
            - name: repo
          run:
            path: sh
            args:
              - -c
              - |
                cd repo/apps/golang
                go test -v .
fly -t tutorial set-pipeline --pipeline go-app --config pipeline.ymlThis change is also visually represented in the web view of the pipeline. The line connecting the resource to the job changes from a dashed line:

To a solid line:
Let's test this out by making a commit. In the examples repo, open apps/golang/main.go. Let's break the tests by changing the AddSix() function to add seven instead of six.
func AddSix(i float64) float64 {
    return i + 7
}
Commit the change and then wait for the pipeline to pick it up and run the tests job. You can click on the resource to see when Concourse finds the commit. You can then back out to the overview of the pipeline and see the job start on its own.
By default, Concourse runs the
checkscript of a resource every ~1 minute. You can click on the resource to see when it was last checked. You can also press the refresh button to force a check to run.
Let's fix the tests by undoing our change.
func AddSix(i float64) float64 {
    return i + 6
}
Again, wait for Concourse to find the new commit and watch the job go back to green.
In the next section we'll add a job to publish our app as a release on GitHub.
Publishing with Put Steps
We're going to add another job now that will publish our little Go app as a GitHub release using the GitHub release resource.
This job will need two pieces of information in order to create a GitHub release:
The git commit to publish as the release
What we want the tag to be (e.g. v0.0.1)
The git commit is already represented by the repo resource defined in our pipeline. We need to add another resource to represent the tag we want to publish.
There are many different ways one could represent the tag value, but since we've already got a git repository setup, we'll continue to leverage that.
Let's create a new branch in our examples repository called version. We'll create a file in there that will contain the name of the next tag we want to publish our app under. You can run the following commands to do this:
# Make a new, empty branch called "version"
git switch --orphan version
# You can make the initial version whatever you want
echo "v0.0.1" > next-version
git add next-version
git commit -m "initial version"
git push -u origin version
Now we can add this as a resource in our pipeline, so our resources look like this:
resources:
  - name: repo
    type: git
    source:
      uri: https://github.com/concourse/examples.git
      username: <user>
      password: github_pat_...

  - name: version
    type: git
    source:
      uri: https://github.com/concourse/examples.git
      username: <user>
      password: github_pat_...
      branch: version
Publishing to GitHub is also going to need another resource because it represents something external to Concourse. Let's add a third resource that will represent our release on GitHub.
resources:
  - name: repo
    type: git
    source:
      uri: https://github.com/concourse/examples.git
      username: <user>
      password: github_pat_...

  - name: version
    type: git
    source:
      uri: https://github.com/concourse/examples.git
      username: <user>
      password: github_pat_...
      branch: version

  - name: release
    type: github-release
    source:
      owner: concourse
      repository: examples
      access_token: github_pat_...
Now we can tie these resources together in a job. We'll create a job called publish that will:
Get the last commit that passed the
testsjob.Get the
next-versionfile from ourversionbranch.Compile our Go app into a binary to publish alongside our release. We'll write a
taskstep to do this.Publish a new GitHub release, uploading the binary, and tagging the commit that last passed
tests.
Add this job under the jobs key in your pipeline:
- name: publish
  plan:
    - get: repo
      passed: [tests] # Only use commits that passed the 'tests' job
    - get: version
    - task: build-binary
      config:
        platform: linux
        image_resource:
          type: registry-image
          source:
            repository: golang
            tag: latest
        inputs:
          - name: repo
        outputs: # Declare an output so the put step can upload our binary
          - name: final-build
        run:
          path: sh
          args:
            - -c
            - |
              output="$(pwd)/final-build"
              cd repo/apps/golang
              go build -o "${output}/addsix" .
    - put: release
      params:
        # Comes from the 'get: version' step
        name: version/next-version
        tag: version/next-version
        # Comes from the 'get: repo' step
        commitish: repo/.git/ref #refer to the git-resource README
        # Comes from the output of our 'task: build-binary' step
        globs: final-build/addsix
Here's the entire pipeline put together:
resources:
  - name: repo
    type: git
    source:
      uri: https://github.com/concourse/examples.git
      username: <user>
      password: github_pat_...

  - name: version
    type: git
    source:
      uri: https://github.com/concourse/examples.git
      username: <user>
      password: github_pat_...
      branch: version

  - name: release
    type: github-release
    source:
      owner: concourse
      repository: examples
      access_token: github_pat_...

jobs:
  - name: tests
    plan:
      - get: repo
        trigger: true
      - task: tests
        config:
          platform: linux
          image_resource: &image #YAML anchor, kind of like a variable
            type: registry-image
            source:
              repository: golang
              tag: latest
          inputs:
            - name: repo
          run:
            path: sh
            args:
              - -c
              - |
                cd repo/apps/golang
                go test -v .

  - name: publish
    plan:
      - get: repo
        passed: [tests]
      - get: version
      - task: build-binary
        config:
          platform: linux
          image_resource: *image
          inputs:
            - name: repo
          outputs:
            - name: final-build
          run:
            path: sh
            args:
              - -cx
              - |
                output="$(pwd)/final-build"
                cd repo/apps/golang
                go build -o "${output}/addsix" .
      - put: release
        params:
          name: version/next-version
          tag: version/next-version
          commitish: repo/.git/ref
          globs: [final-build/addsix]
Let's update our pipeline:
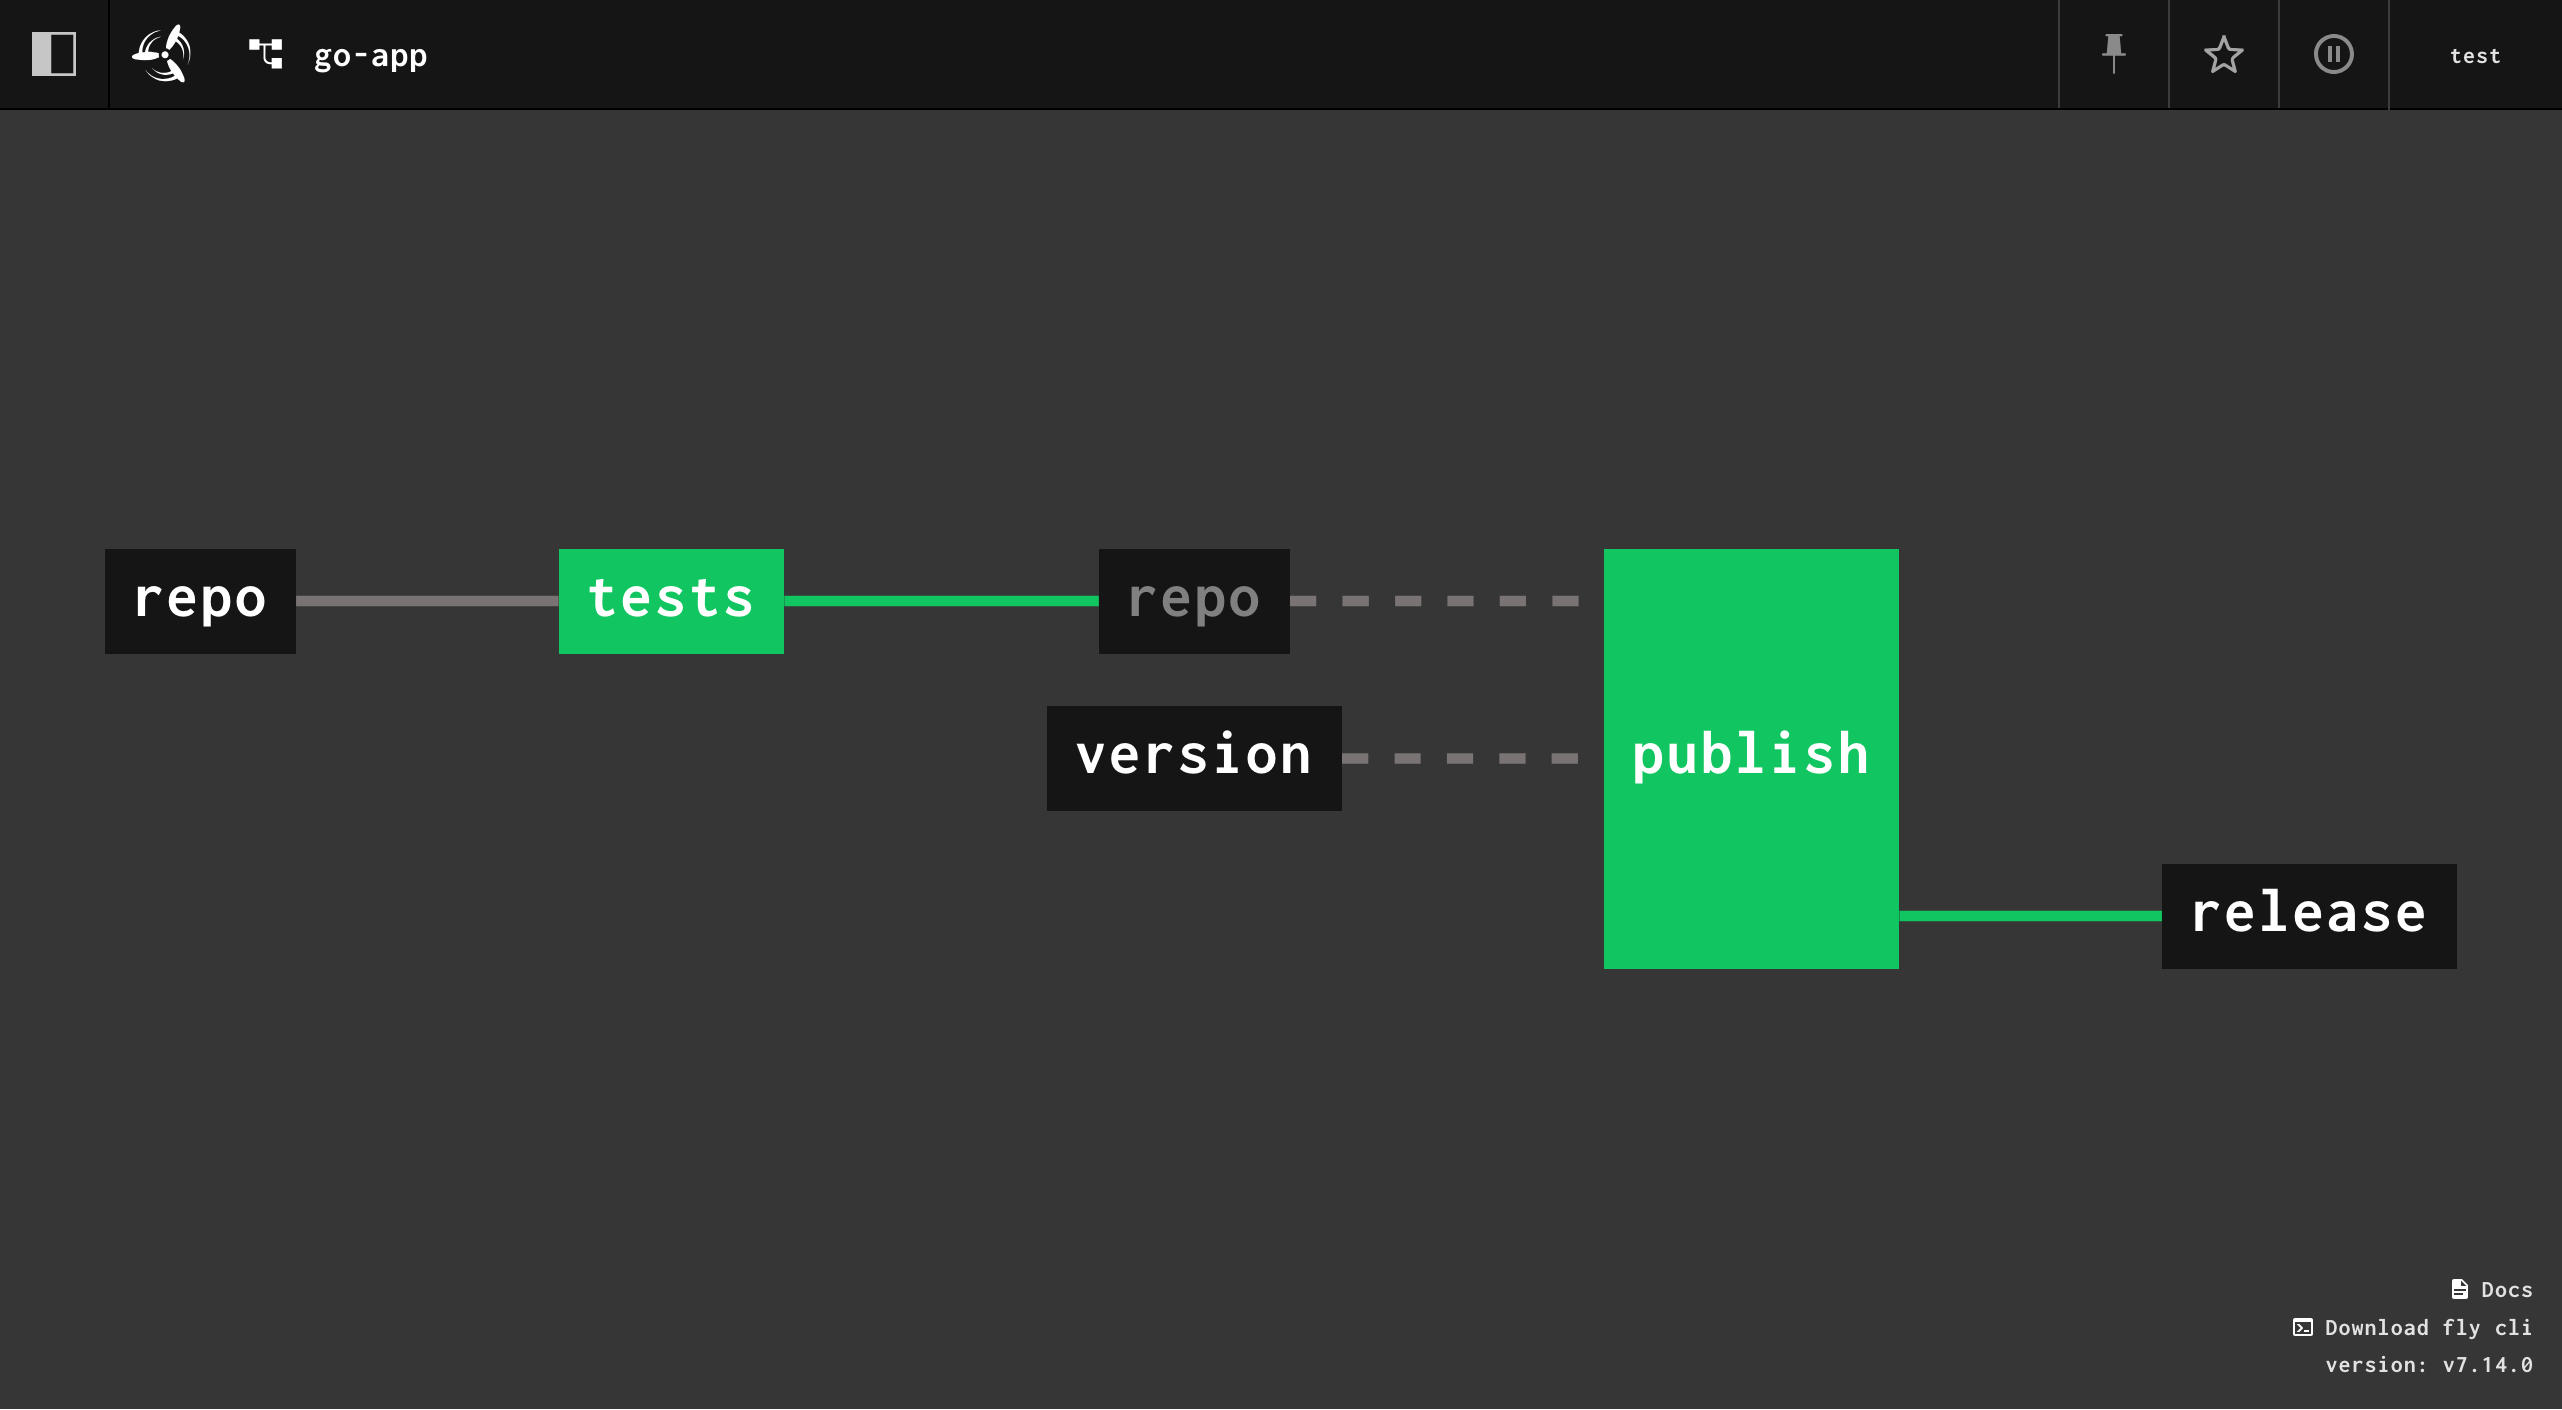
fly -t tutorial set-pipeline --pipeline go-app --config pipeline.ymlThe pipeline should look like this in the web UI:

Go ahead and manually trigger the publish job. It should complete successfully and the logs should look similar to this:

You'll notice that an extra
getstep snuck in there after theputstep at the end. Concourse does this automatically after everyputstep because aputstep has no outputs. So if you ran aputstep in the middle of your job and wanted to use whatever you just published/uploaded in a later step, you wouldn't have access to it. Concourse resolves this by automatically adding and running agetstep.This extra
getis not always necessary of course. If you want to have Concourse skip adding thisgetstep, you can setno_gettotruein theputstep. This will save a few seconds off of your builds.
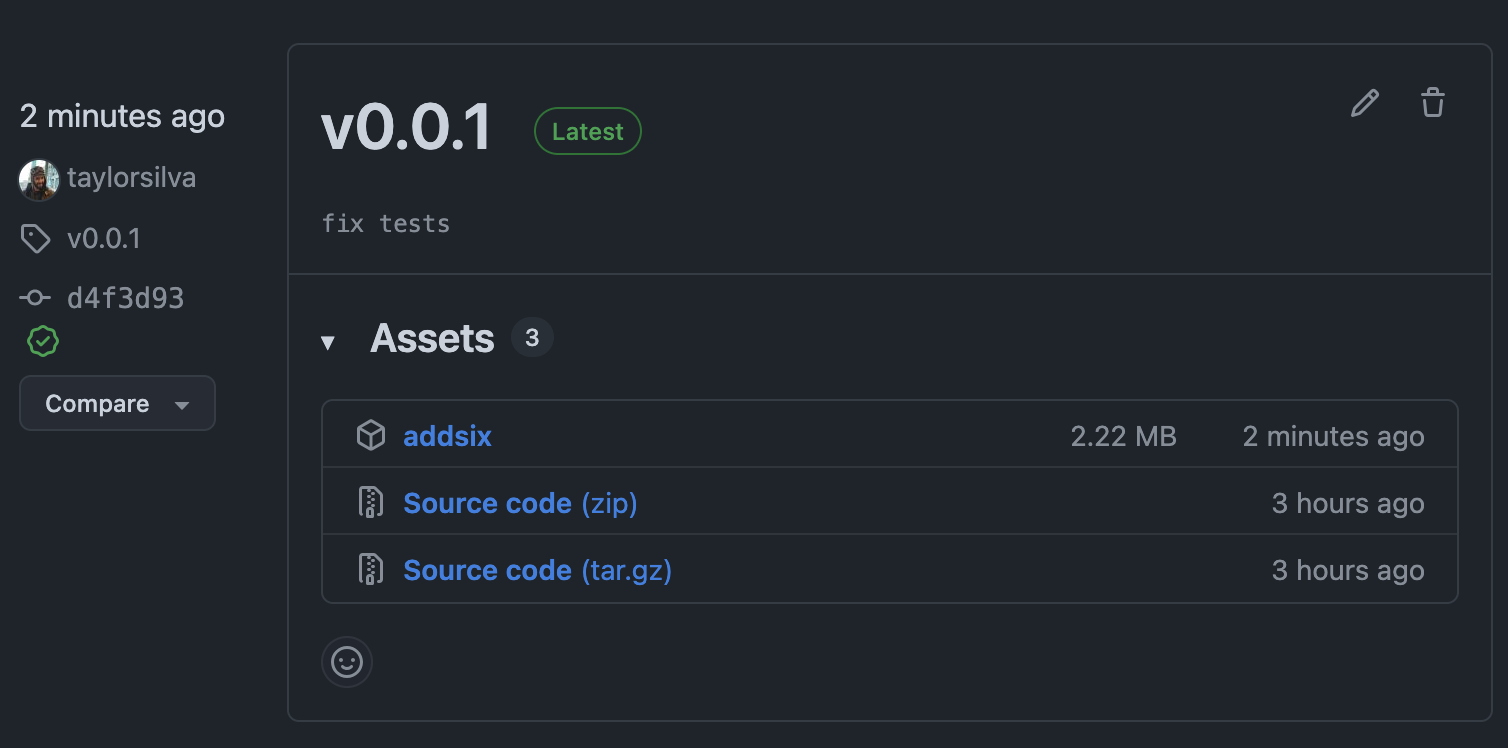
On GitHub you should see your release published, along with the binary addsix attached to the release:
That's the whole pipeline! Congratulations on testing, building, and publishing a silly little Go app with a Concourse pipeline 🎉
Using External Resource Types
Concourse comes bundled with a lot of resources that are enough for most people to start using Concourse with. However, users will want to extend Concourse to work with all sorts of systems and that means bringing your own Resource Types.
Adding a resource type to your pipeline looks very similar to adding a resource. You can even override the bundled resource types by re-declaring them in your pipeline.
Remember, a resource is a container image. So to pull in a new resource type you need to tell Concourse where to pull the image from. This is done by using the built-in registry-image resource. The process of adding a resource type is just like adding a regular resource, just under the top-level resource_types key instead.
If you're looking for more resource types, there's a catalog of them at resource-types.concourse-ci.org.
Time For Takeoff ✈️
This brings us to the end of the tutorial. You should have a basic understanding about how to read Concourse pipelines and start creating your own. Here are some other parts of the site to help you take off with Concourse:
How-To Guides - Contains practical guides for working with pipelines and examples of common pipeline workflows, such as git and container workflows.
Check out all the reference documentation:
Find other resources at resource-types.concourse-ci.org or put
something concourse resourceinto your favorite search engine.
Best of luck on your automation journey!
If you have any feedback for this tutorial please share it in this GitHub discussion
 powered by